Setting up the domain
When you set up forwarding to HelpDesk, you’ll be able to send and receive messages from customers in HelpDesk using a dedicated email address provided by us.
This address will look like this: LICENSE-ID@tickets.helpdesk.com.
Here’s an example:1976920755@tickets.helpdesk.com.
Set up a custom domain if you want to:
- Send messages from your own email address.
- Send messages from an email address using our domain but with your unique name, for example, company.helpdesk.com.
In the next step, you’ll learn about two types of domains — a custom domain or a domain provided by HelpDesk — and how to set them up.
Setting up a custom domain
To enable sending messages from your own address, we need to verify domain ownership and add certain DNS records to your domain to allow us to use the address in your replies.
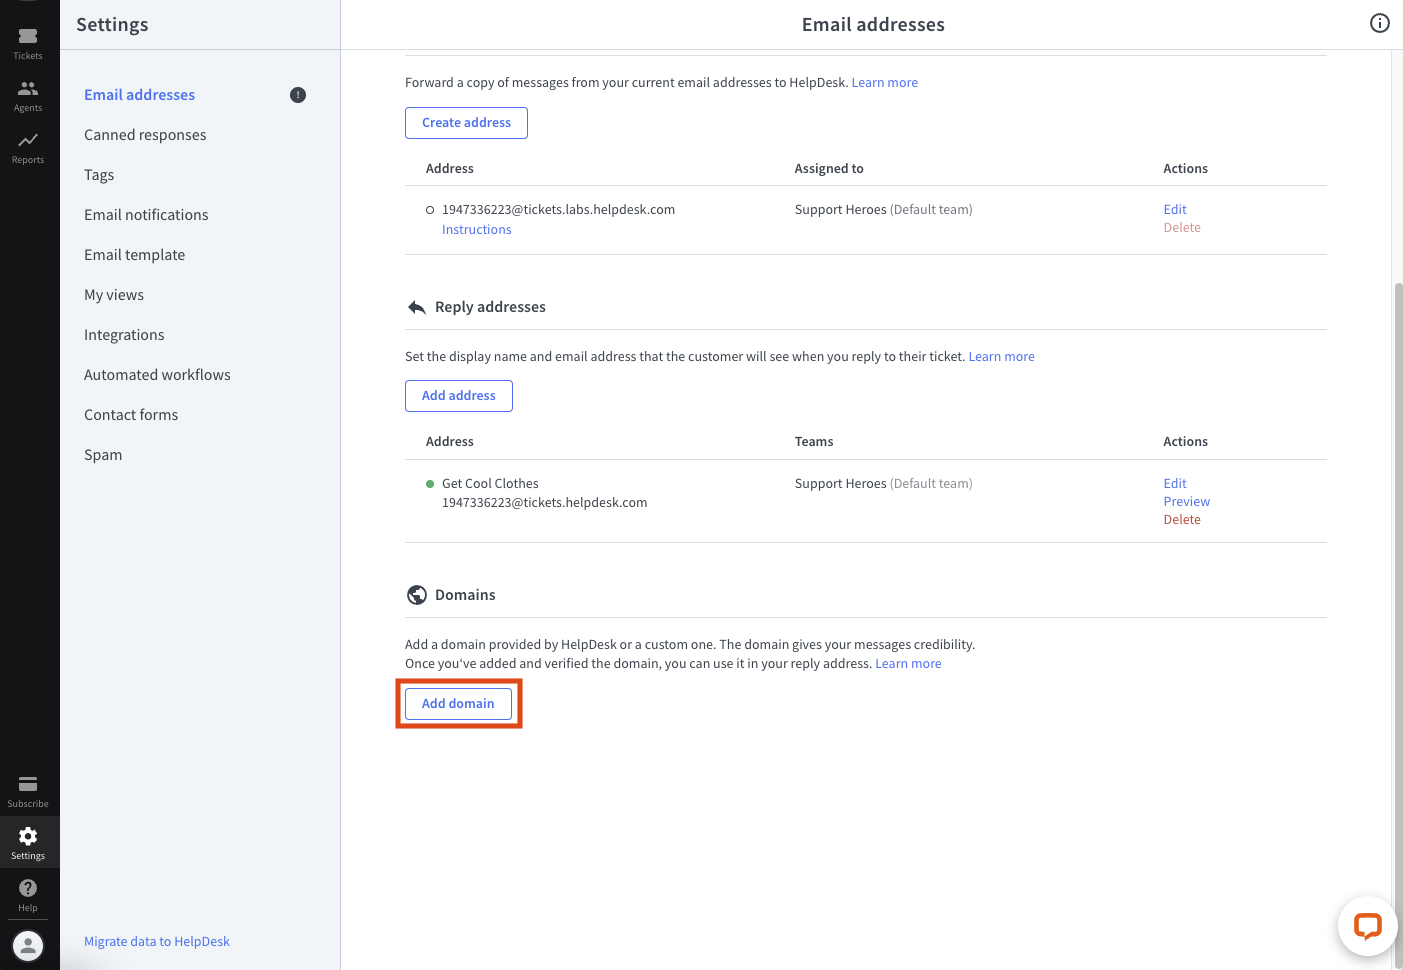
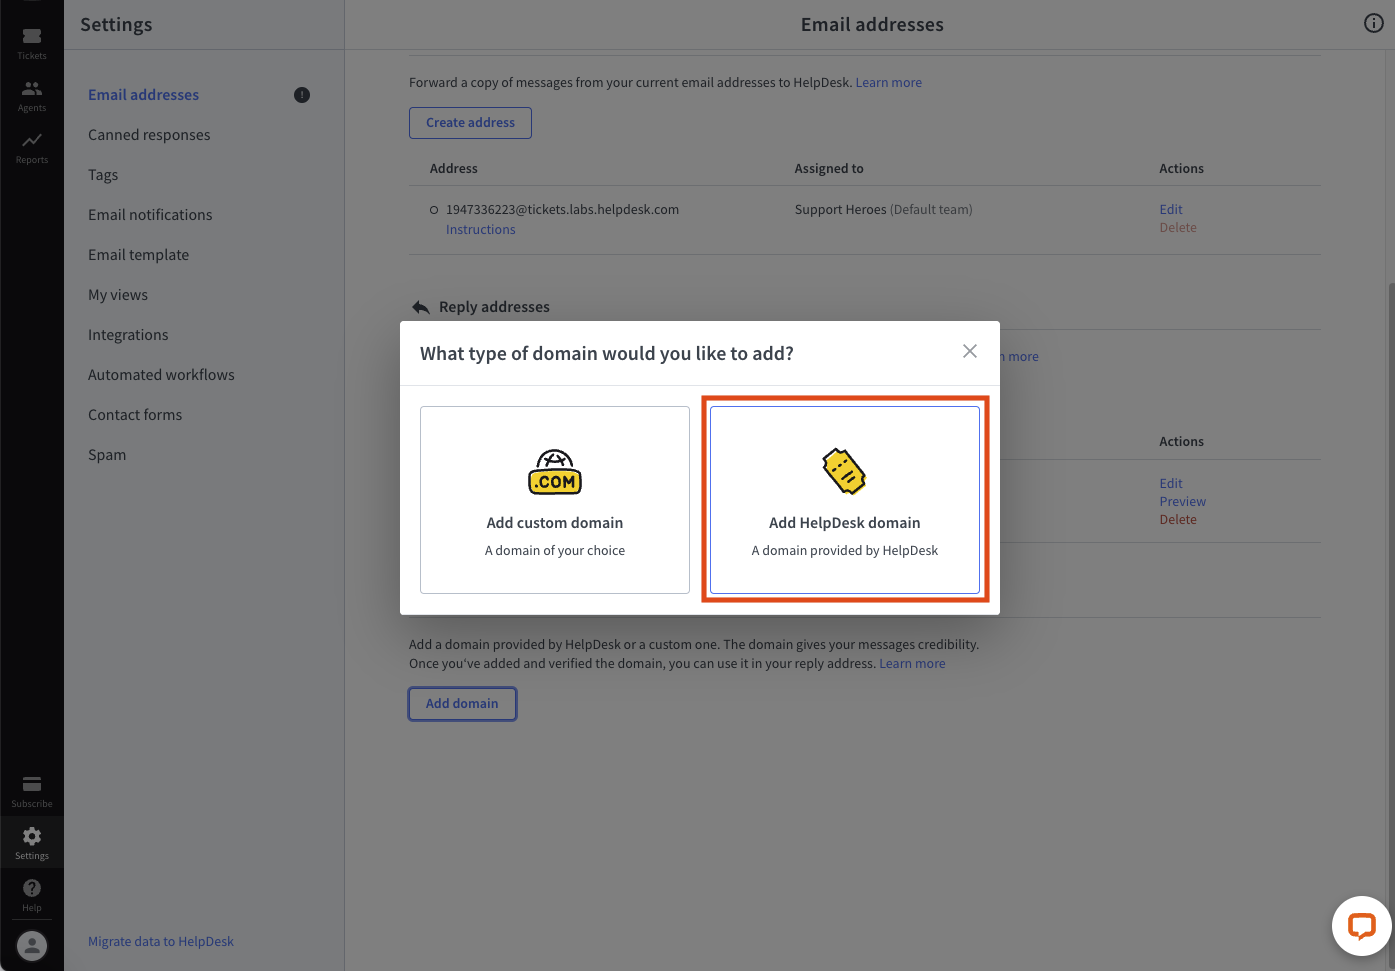
First, go to settings, choose the “Email addresses” category, and click on the “Add domain” button.
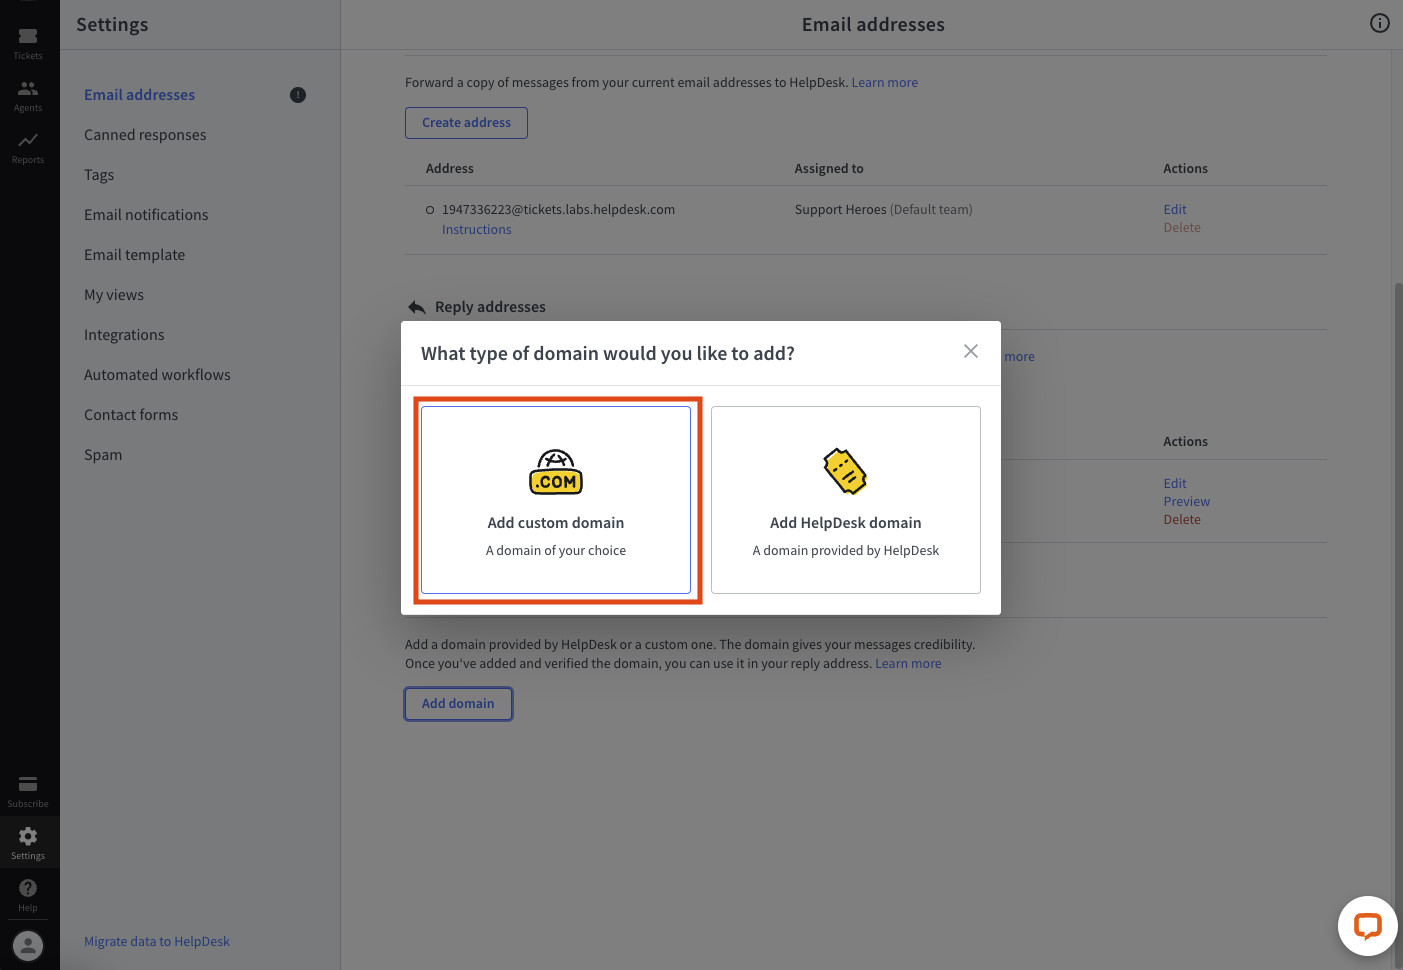
Then, select the “Add custom domain” option.
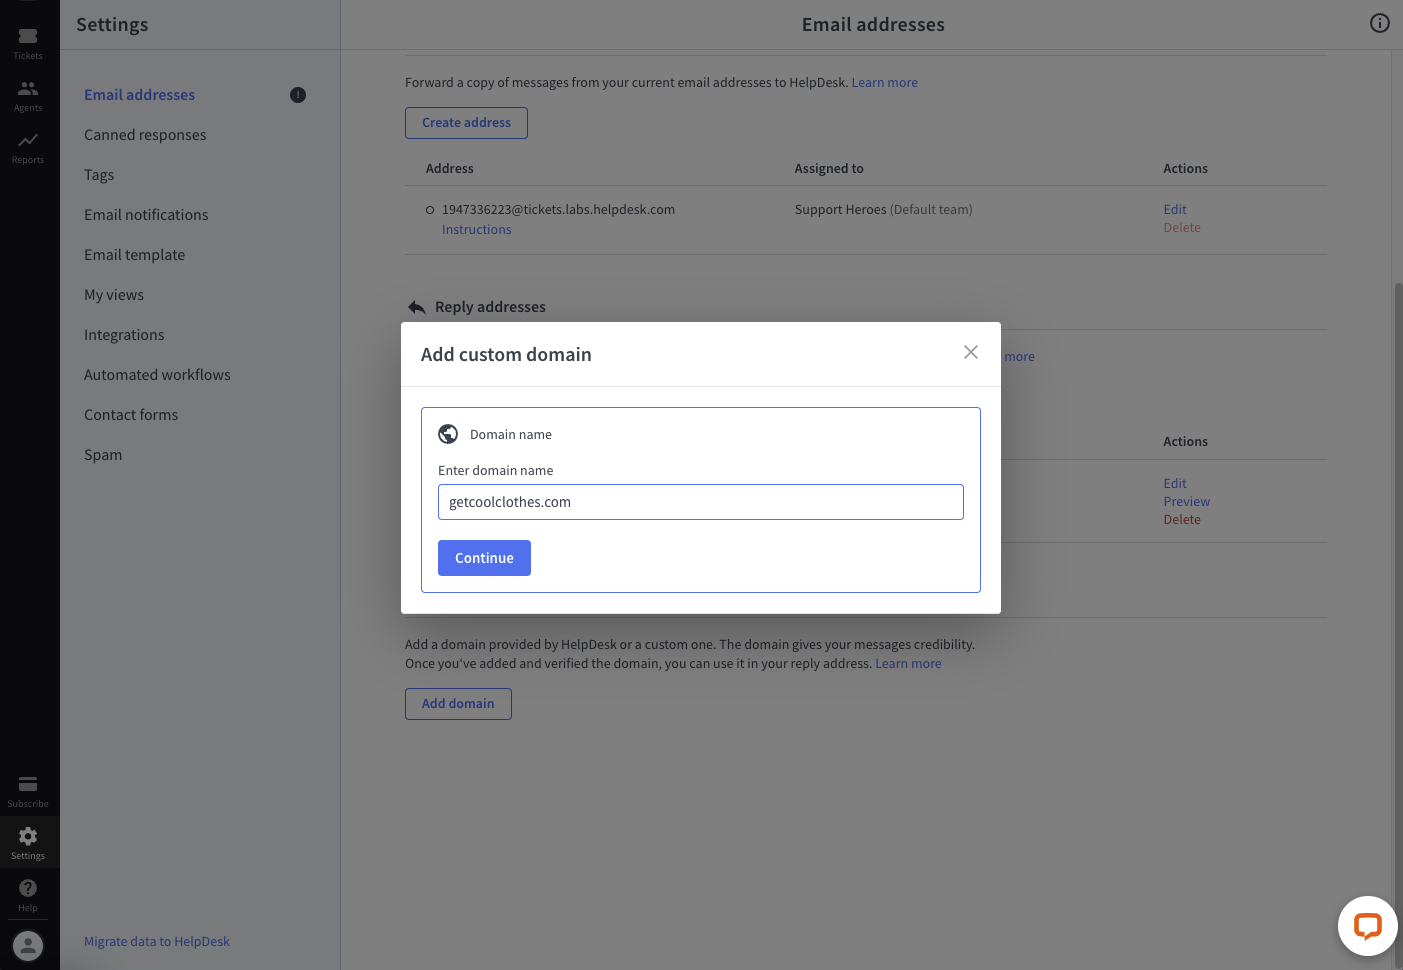
Next, write your domain name down. Remember that you need to have access to the domain administrator panel to continue.
Then, you’ll see the ownership verification stage, consisting of three mandatory steps:
- Logging to your domain administration panel
- Going to the DNS setup of your domain and editing DNS records
- Adding a new CNAME record with the provided hostname and value

After you add records to your DNS settings, click on the “Verify and continue” button. This step allows us to verify domain ownership.
If something goes wrong, you’ll see an error message.

If the verification is successful, you can go to the third stage with the HelpDesk connection.
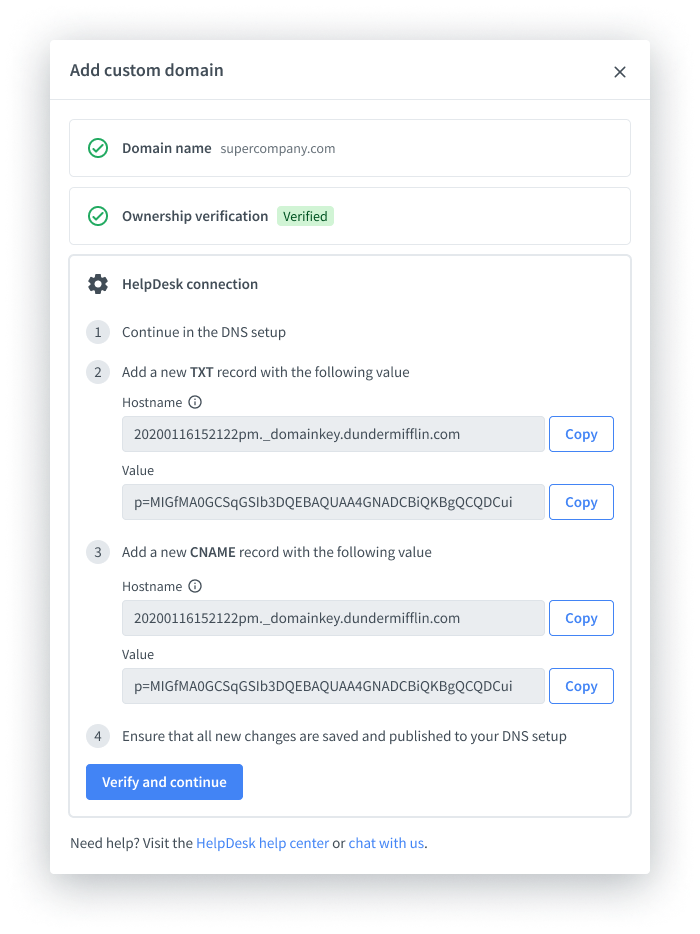
In the HelpDesk connection step, there are four steps you need to follow:
- Continuing in the DNS setup
- Adding a new TXT record with a provided value
- Adding a new CNAME record with a provided value
- Ensuring that all new changes are saved and published to your DNS setup
Note:
This step adds additional DKIM keys to the domain DNS, allowing HelpDesk to send your replies from your own address without triggering spam filters.
Once the process is complete, you’ll see a summary screen and after that a notification that your domain is being confirmed by the HelpDesk team.


You can add one or more custom domains to improve specialization, organization, and customer service in the following ways:
- Specialization. Directs cases to agents with the right expertise, leading to quicker and more accurate resolutions.
- Organization. Allows for domain-specific workflows, policies, and escalation paths, streamlining support operations.
- Scalability. Facilitates easy adaptation to new departments or services without disrupting existing support structures.
- Customer segmentation. Better addresses the needs of different customer groups by providing specialized support channels.
This approach significantly enhances the efficiency and effectiveness of support services, leading to higher customer satisfaction and operational improvements.
Domain verification process
The domain you added still needs to be verified. We’ll inform you in the “Status” section when the domain is verified. Until then, you’ll see the “Confirming…” status. This process can take up to a few hours.

You’ll receive an email notification when the domain is verified.

After verification, the domain status will be “Added.”
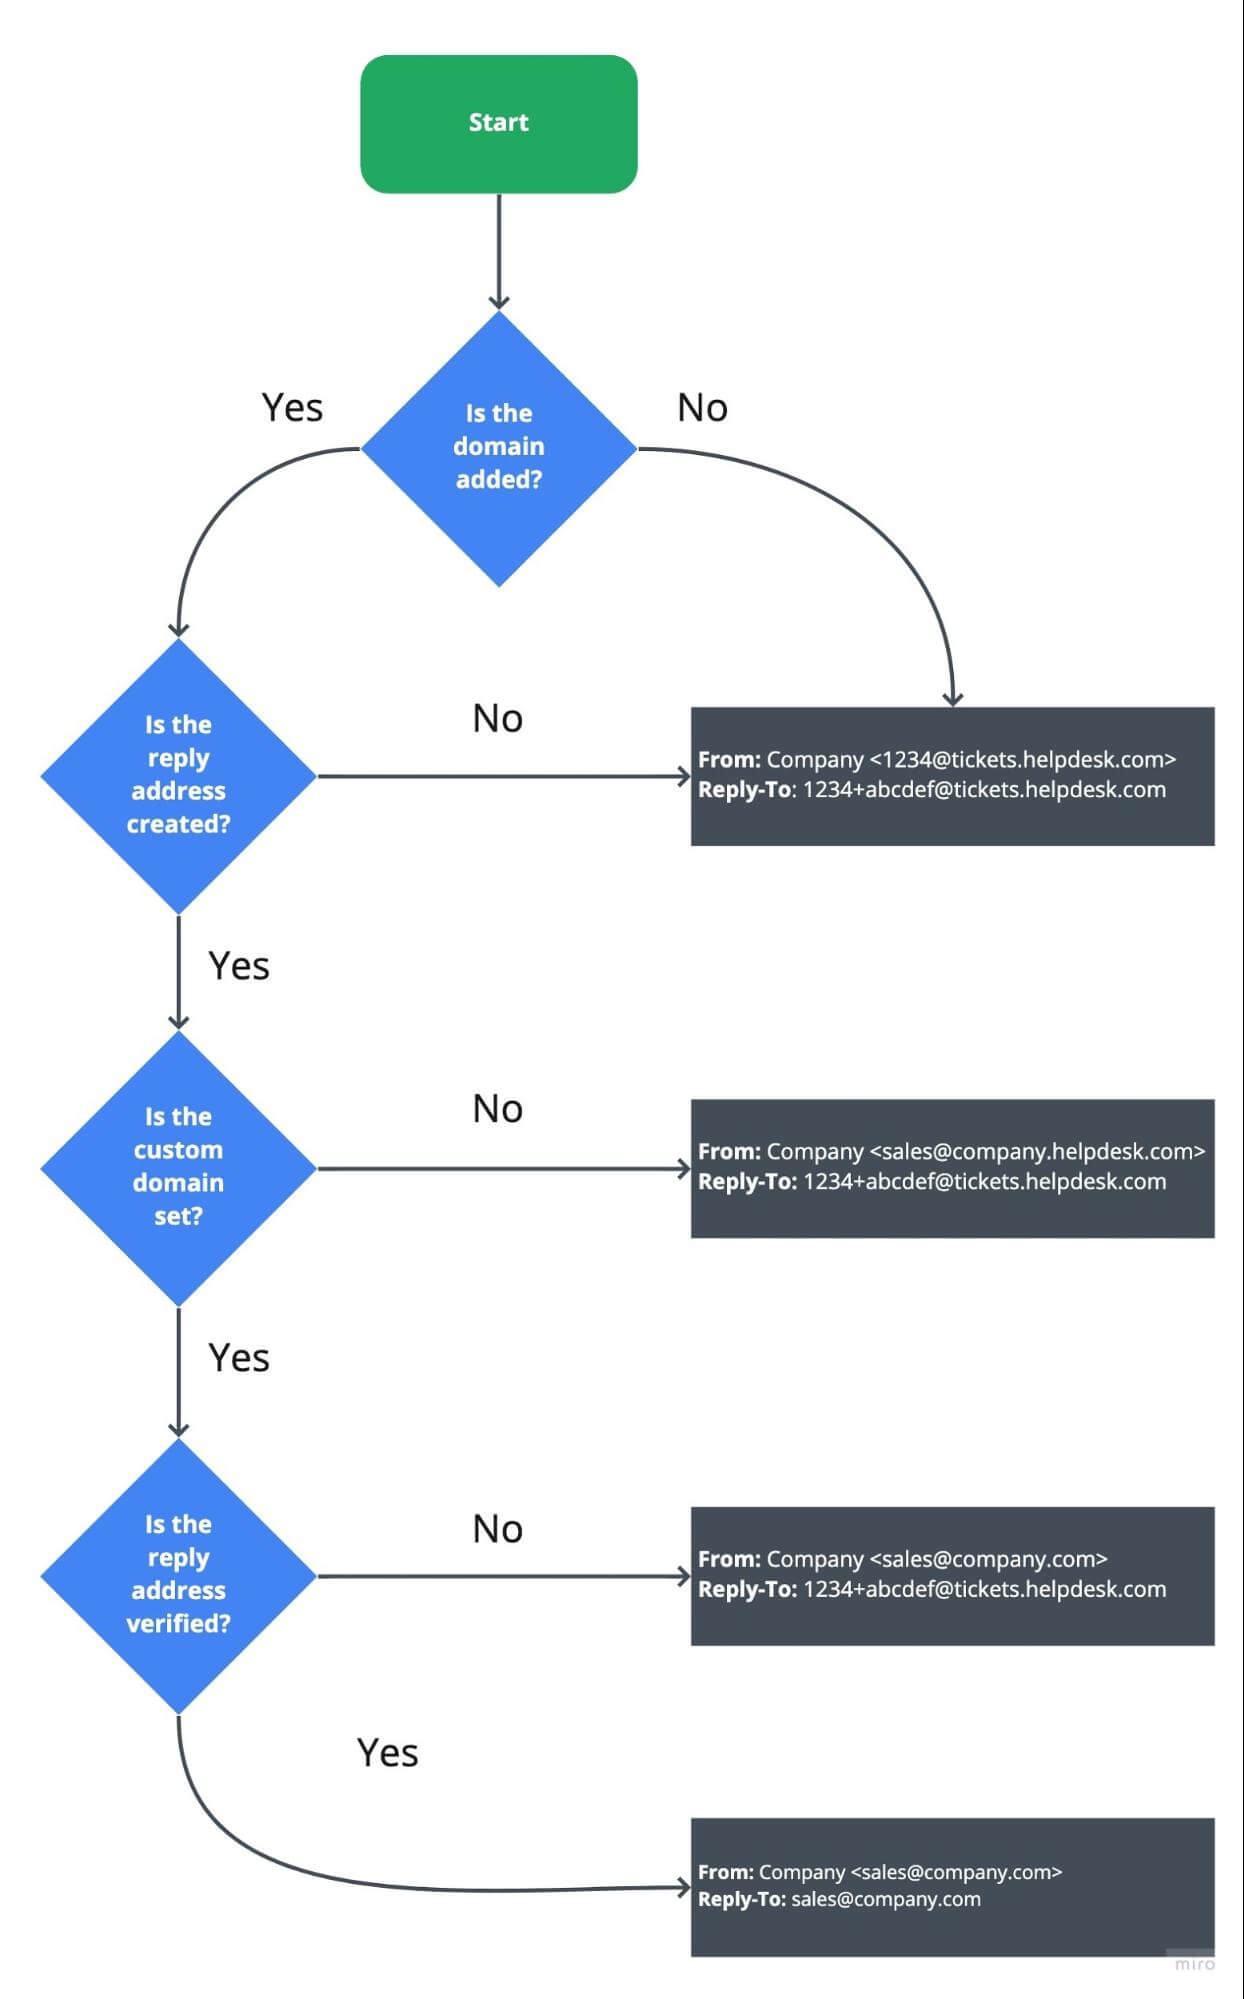
As soon as the domain is verified, you must set up forwarding to HelpDesk from the email address you’ll use as the reply address. Otherwise, you won’t be able to see the responses sent by customers in HelpDesk.
We explain this process in part on setting up the forwarding address and the reply address.
Setting up a HelpDesk domain
Another option to change your HelpDesk email address from the one with your license number is to set up a new domain provided by us. This option is useful if you don’t want to set up your own domain, or you don’t have one.
This way, for example, your domain name will look like this:
[yourcompanyname].helpdesk.com
Instead of:
tickets.helpdesk.com
First, go to settings, choose the “Email addresses” category, and click on the “Add domain” button.
Then, select the “Add HelpDesk domain” option.
Enter your new domain name and click on the “Add” button.
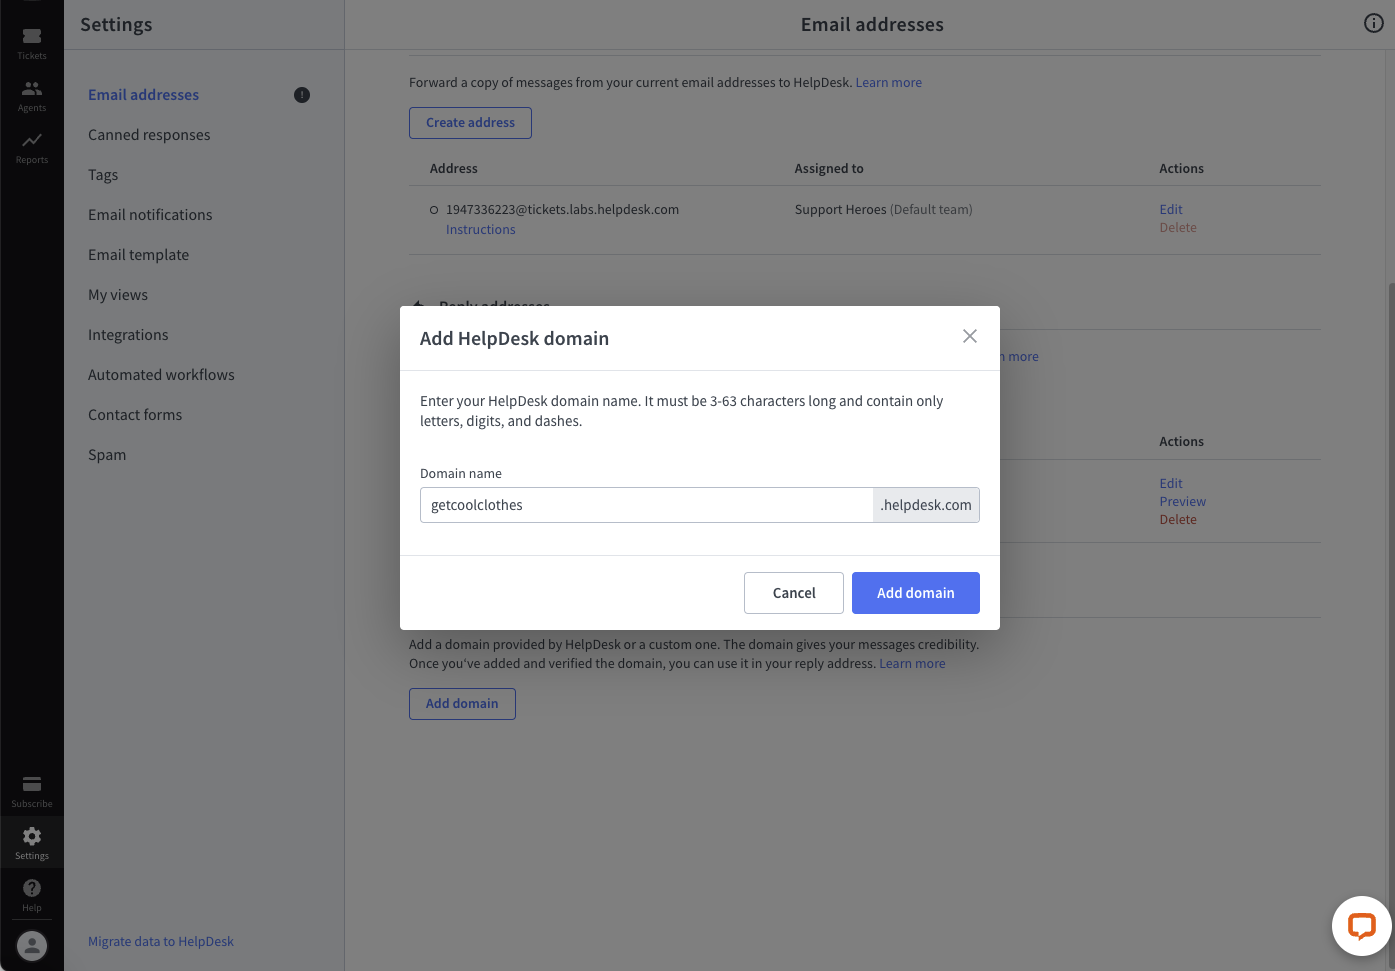
If the domain name you choose is available, you’ll see a confirmation for adding your new domain.
Domain verification statuses
There are four statuses you can track when it comes to adding a domain in HelpDesk:
- Added — when your domain is added properly
- Confirming… — when the HelpDesk team is confirming your domain
- Finish adding — when you have an unfinished process of adding a domain
- Deleting… — when you decided to delete your domain
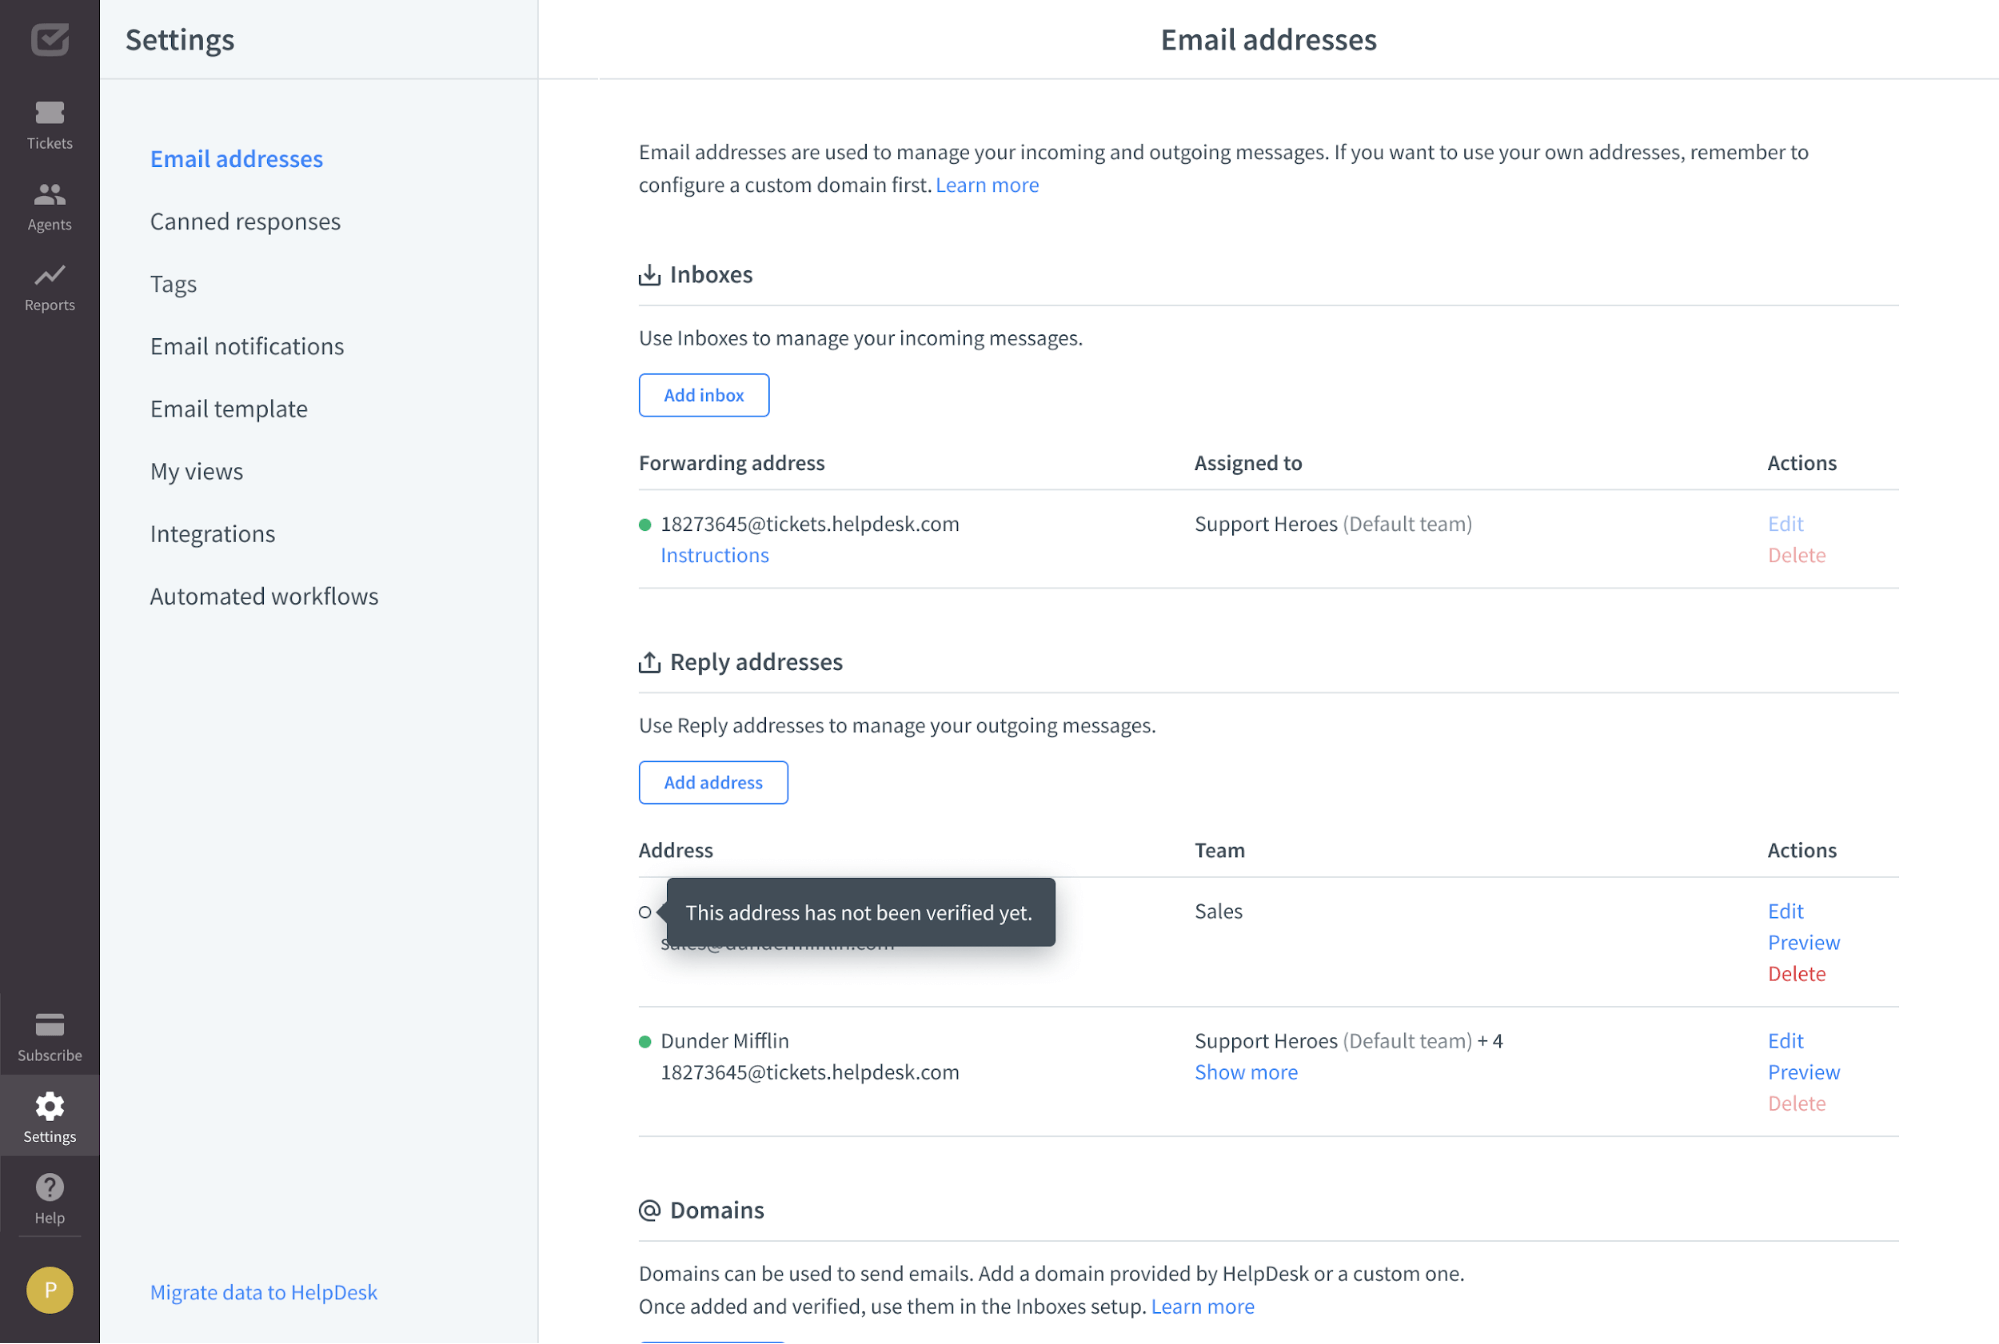
Setting up the forwarding address
Forwarding addresses are used to manage your incoming messages.
Once you’ve added and verified your domain name, you need to set up your forwarding address. To do this, go to settings, select the “Email Addresses” section, and click on the “Create Address” button.
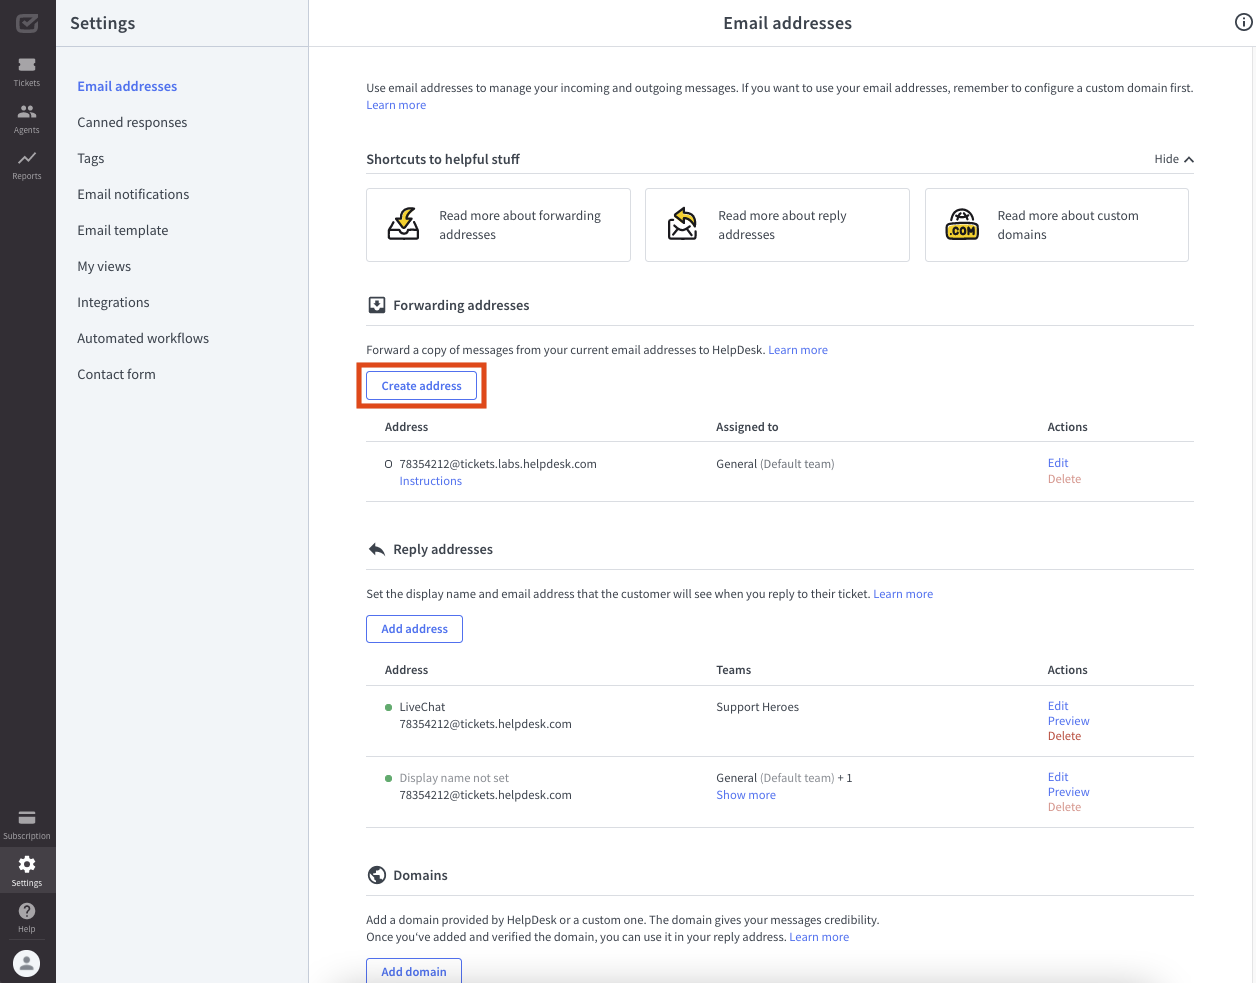
First, type your current email addresses from which you’re going to forward messages in the appropriate field. This should be the email address from which copies of messages are sent to HelpDesk when forwarding is set up correctly. It can be your personal email address or company email address.
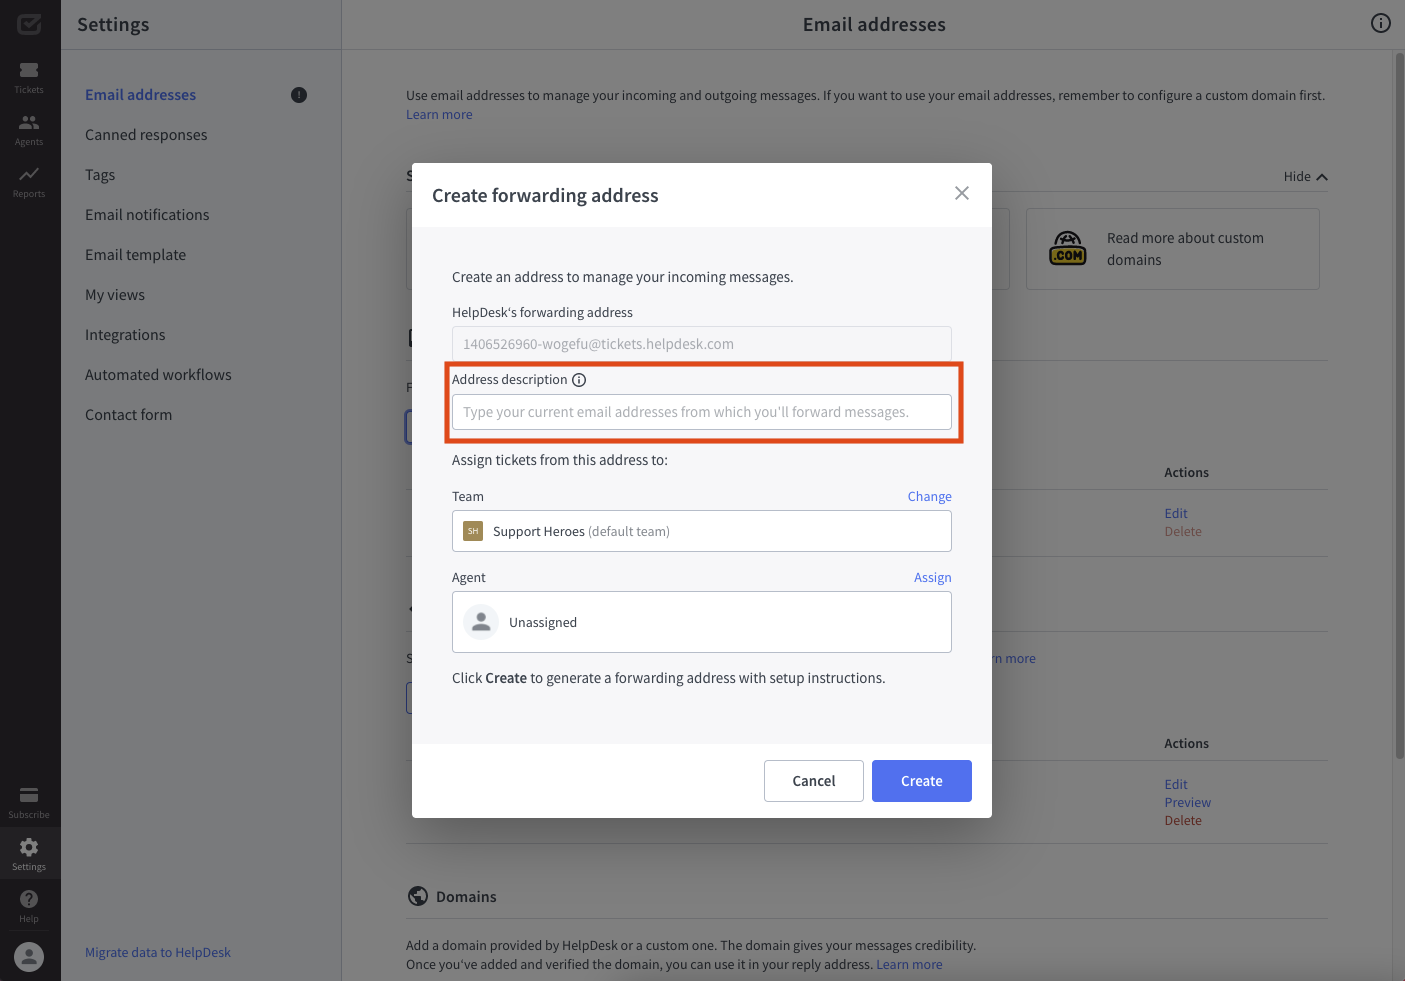
The address description is also included as information in the ticket. It’s displayed only to you so that you know the actual source of the ticket.

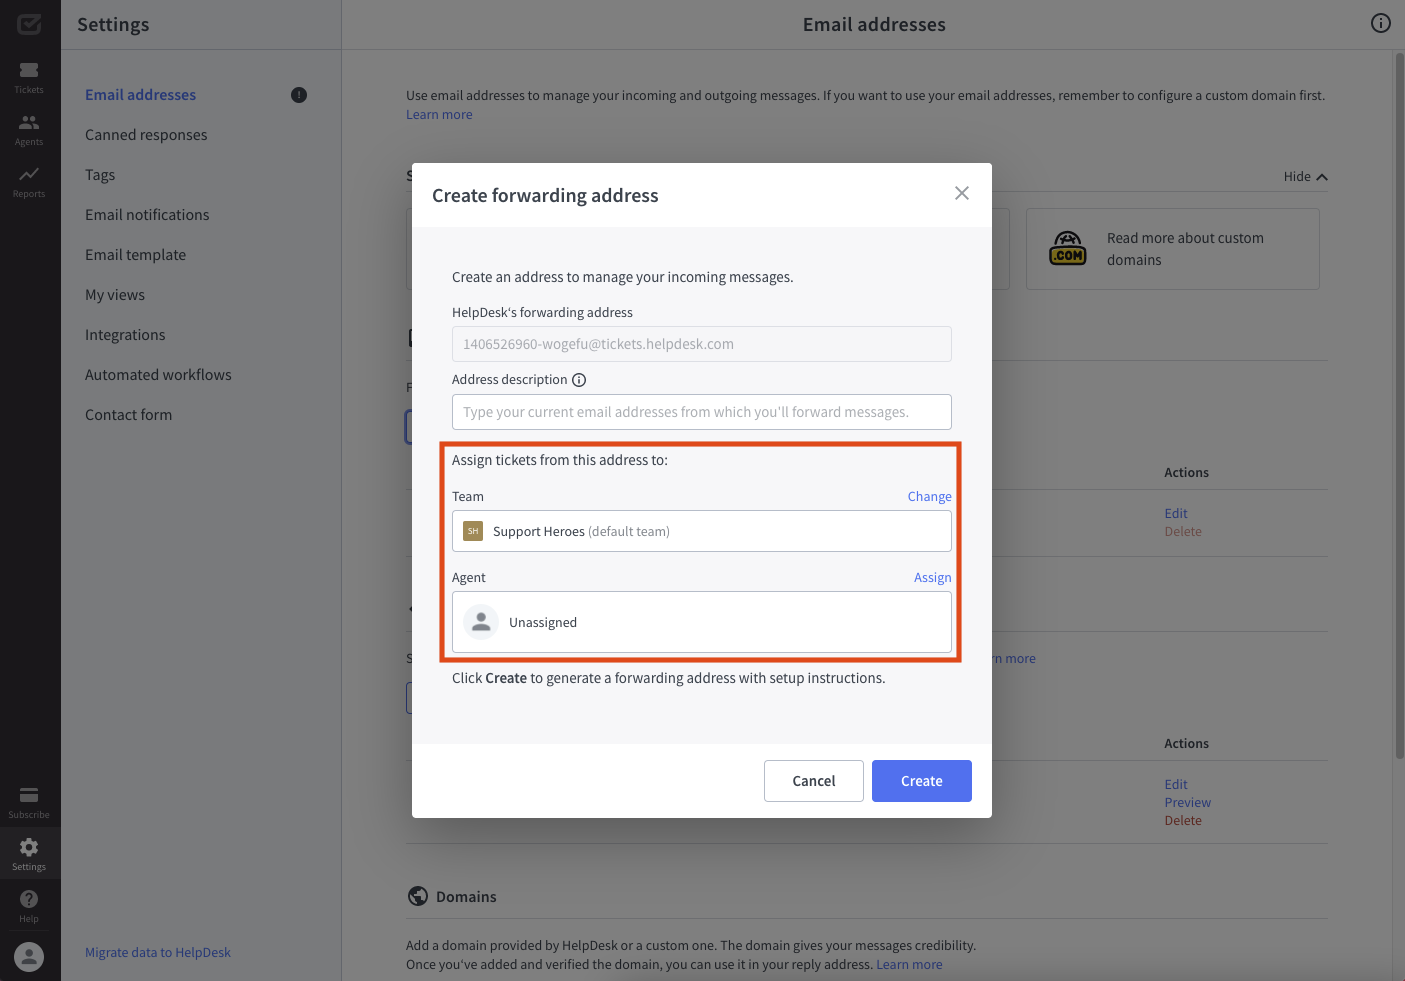
Going back to your forwarding address settings, after adding the address description, you need to select a team and, optionally, an agent who will be automatically assigned when a ticket arrives at that email address.
This is what your new forwarding address settings can look like after configuration.
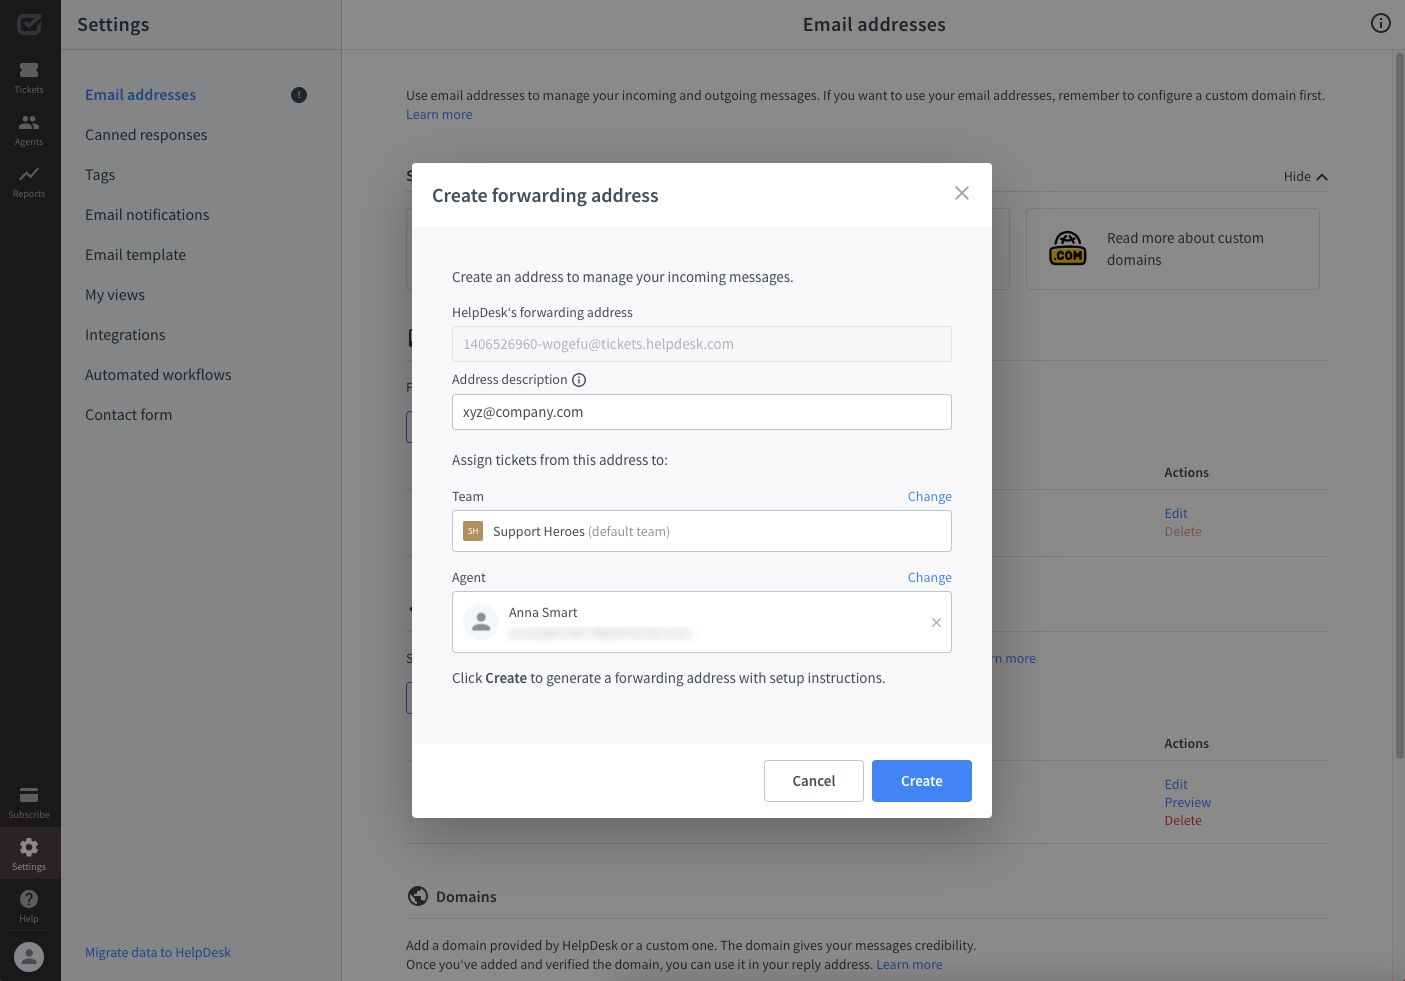
By default, your tickets will be assigned to the “Default team.”
After clicking Done, your new forwarding address will appear on the addresses list.

Next, you need to set up forwarding for a specific email address to HelpDesk. Click on the “Instructions” button to learn how to do this.

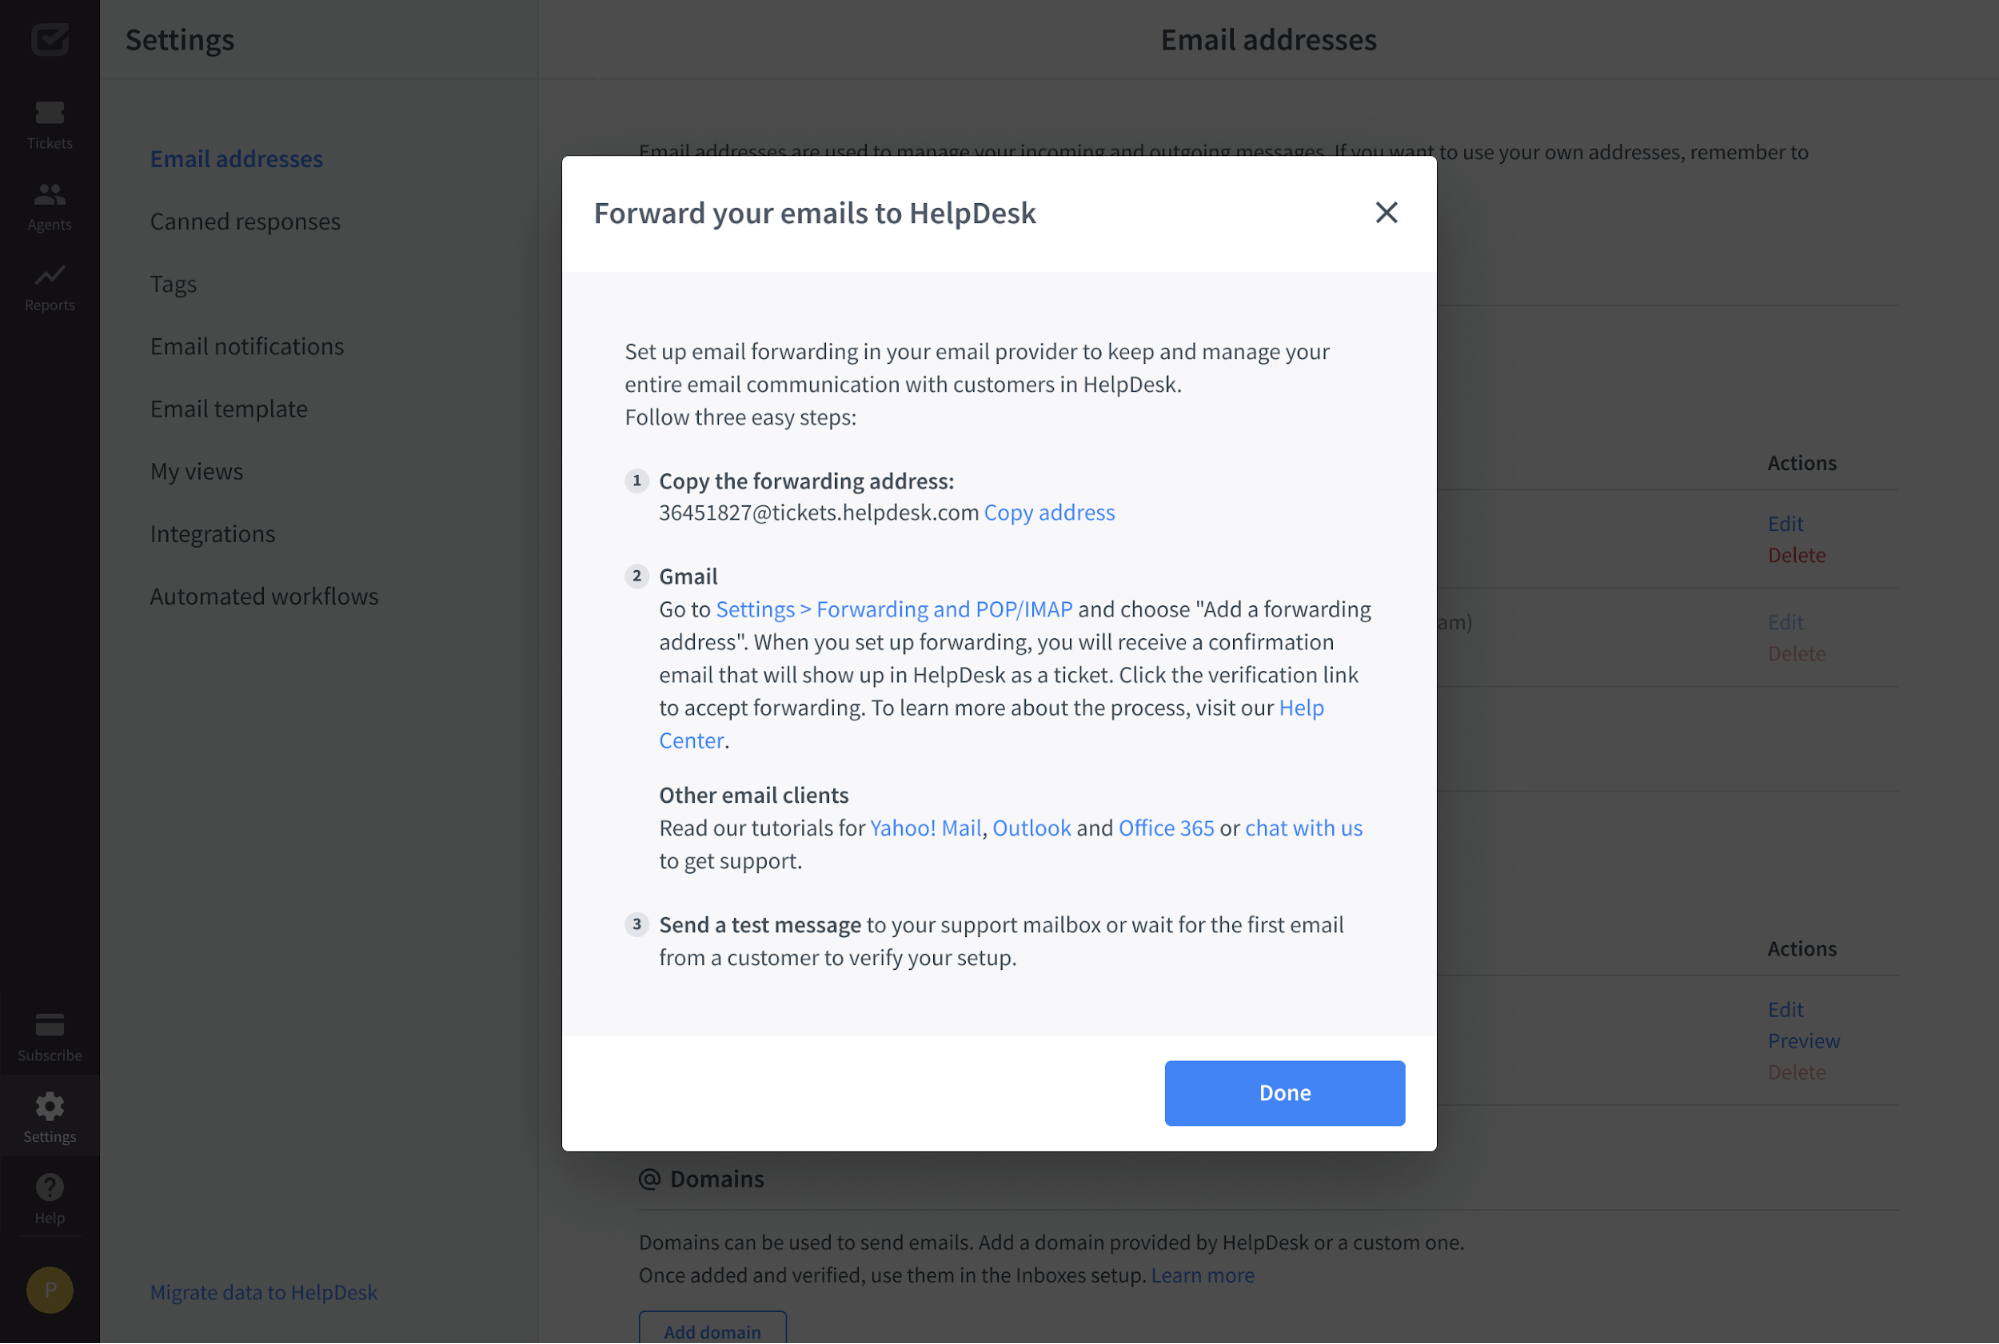
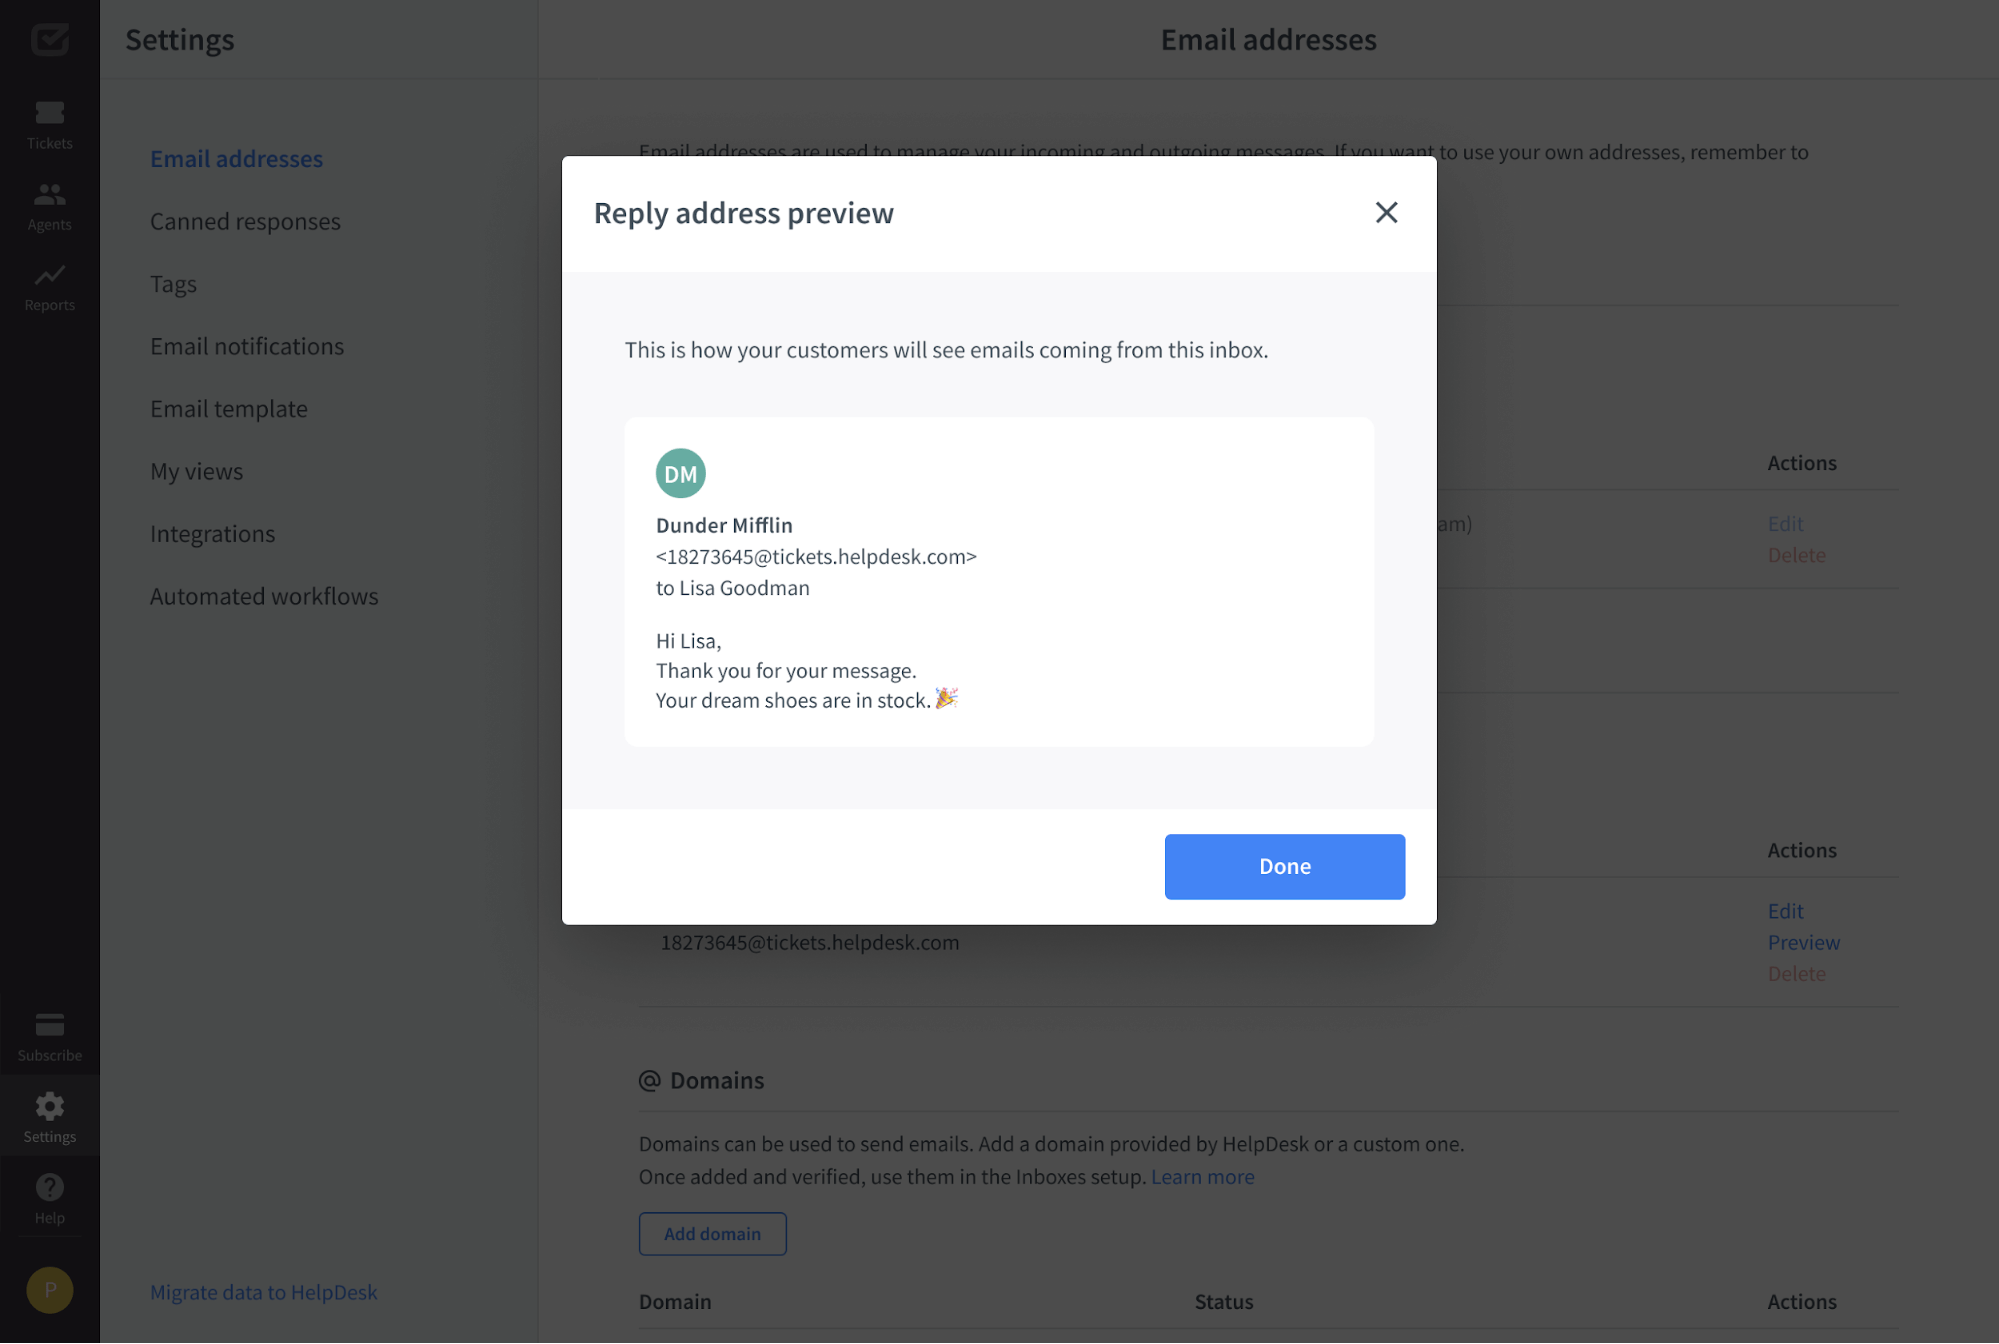
If the setup is completed, you can check out how your name and address will look in the requester’s inbox by clicking on the “Preview” button.
Setting up the reply address
Reply address is used to manage your outgoing messages. If you want to set the reply address, you must add a domain first. It was described earlier in this article.
To add a reply address, go to settings, choose the “Email addresses” section, and click on the “Add address” button.

Choose a display name for the reply address. Next, enter a valid reply address along with the domain. The final step is to assign one of your teams to the reply address. Once everything is set, click the “Done” button to save your changes.
Adding the reply address to the team
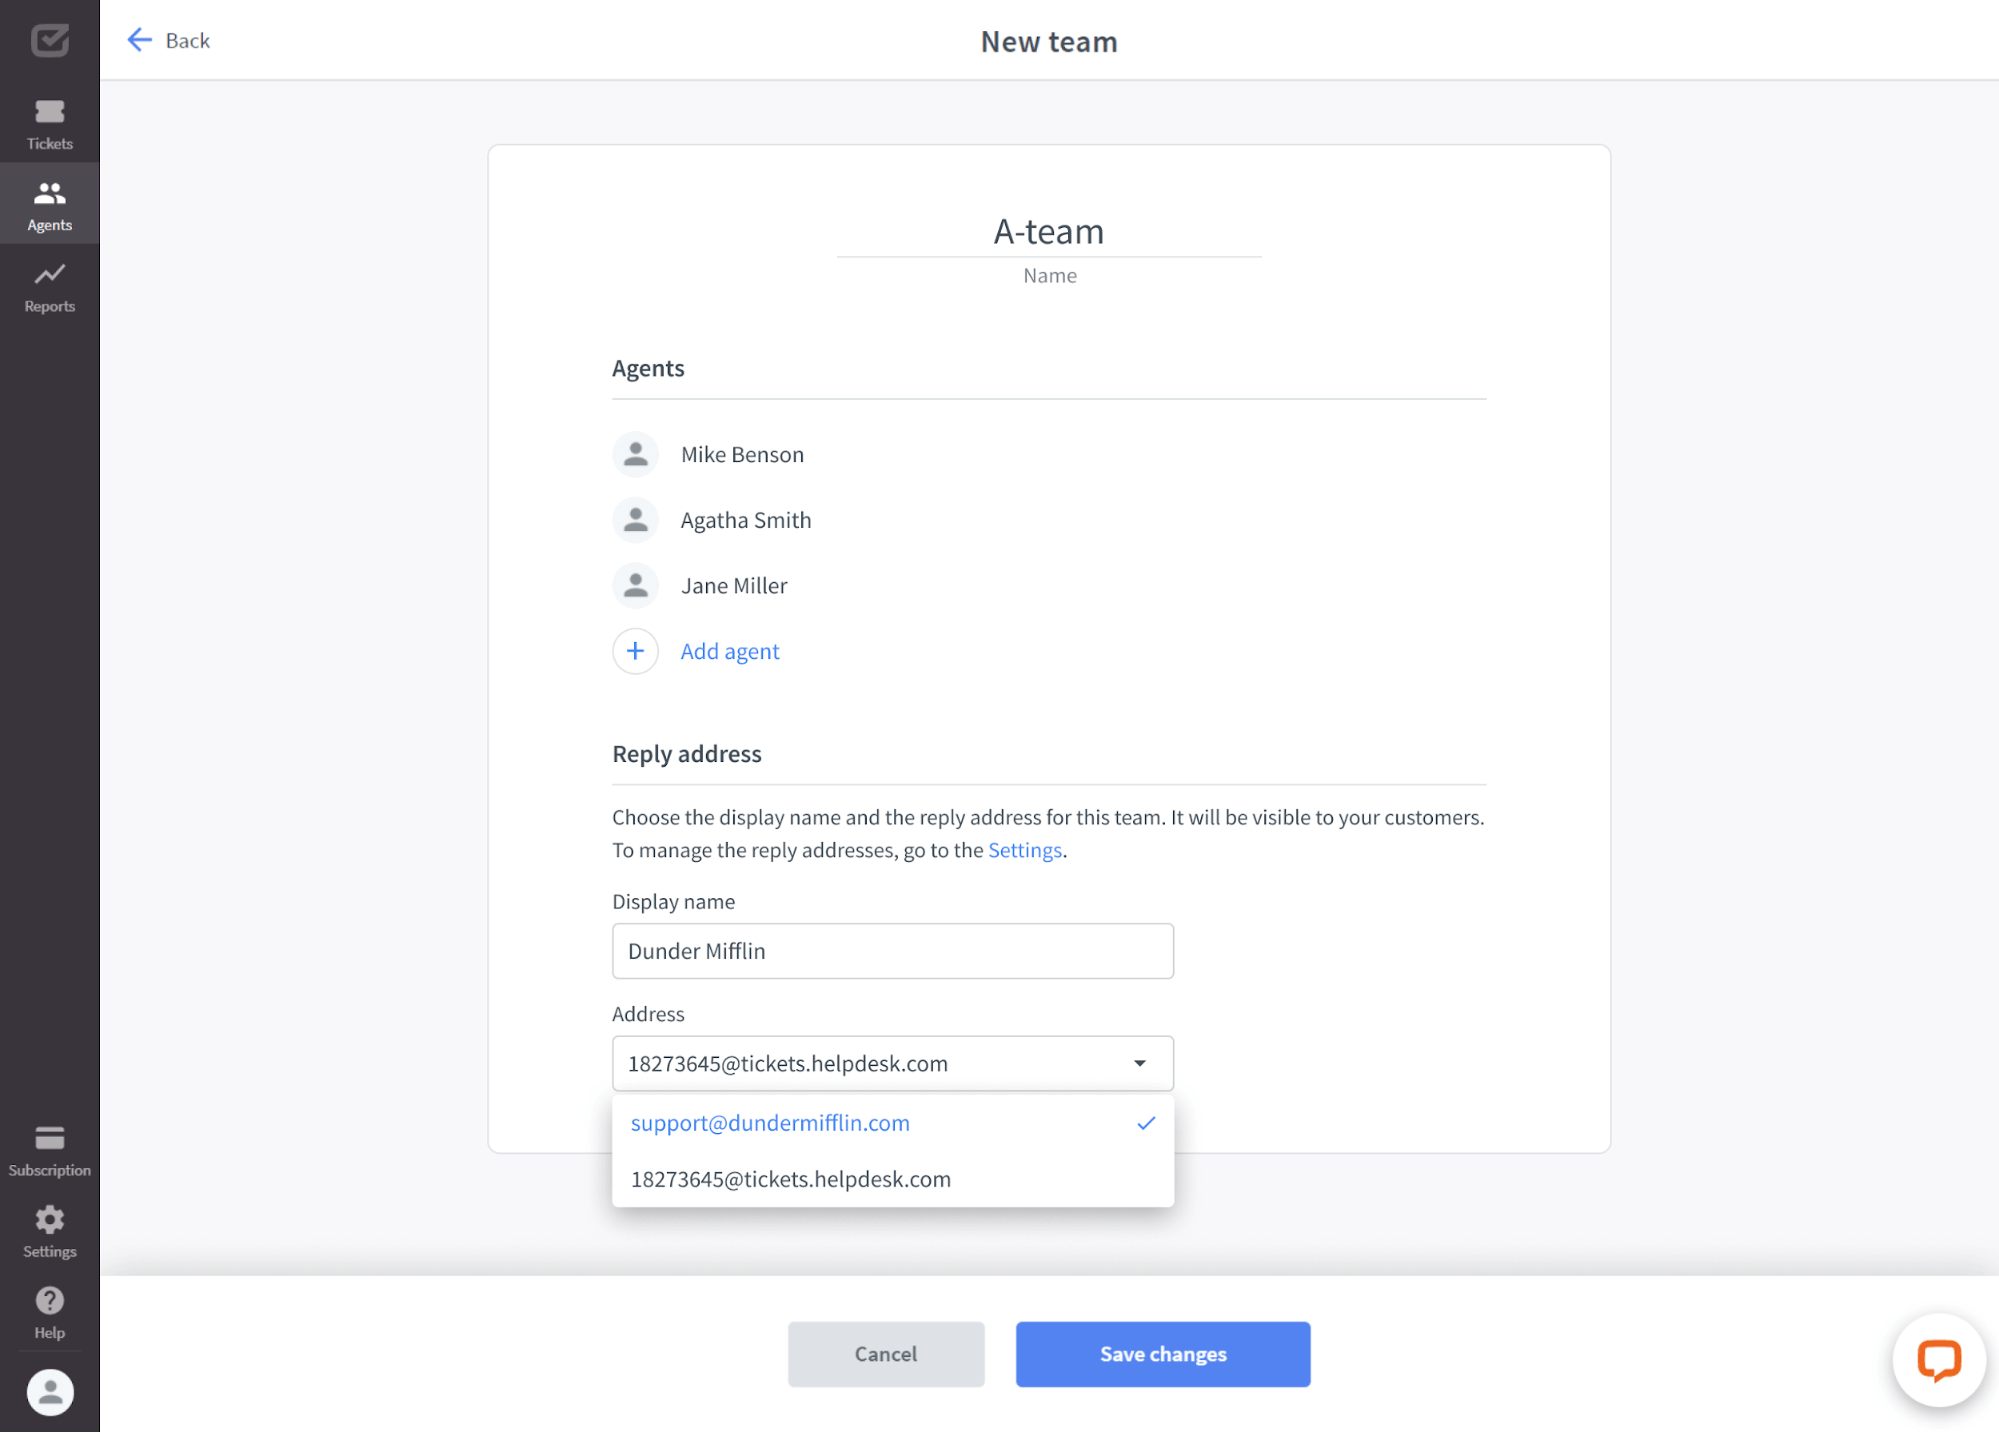
You can set up the reply address when you add or edit your team in HelpDesk.
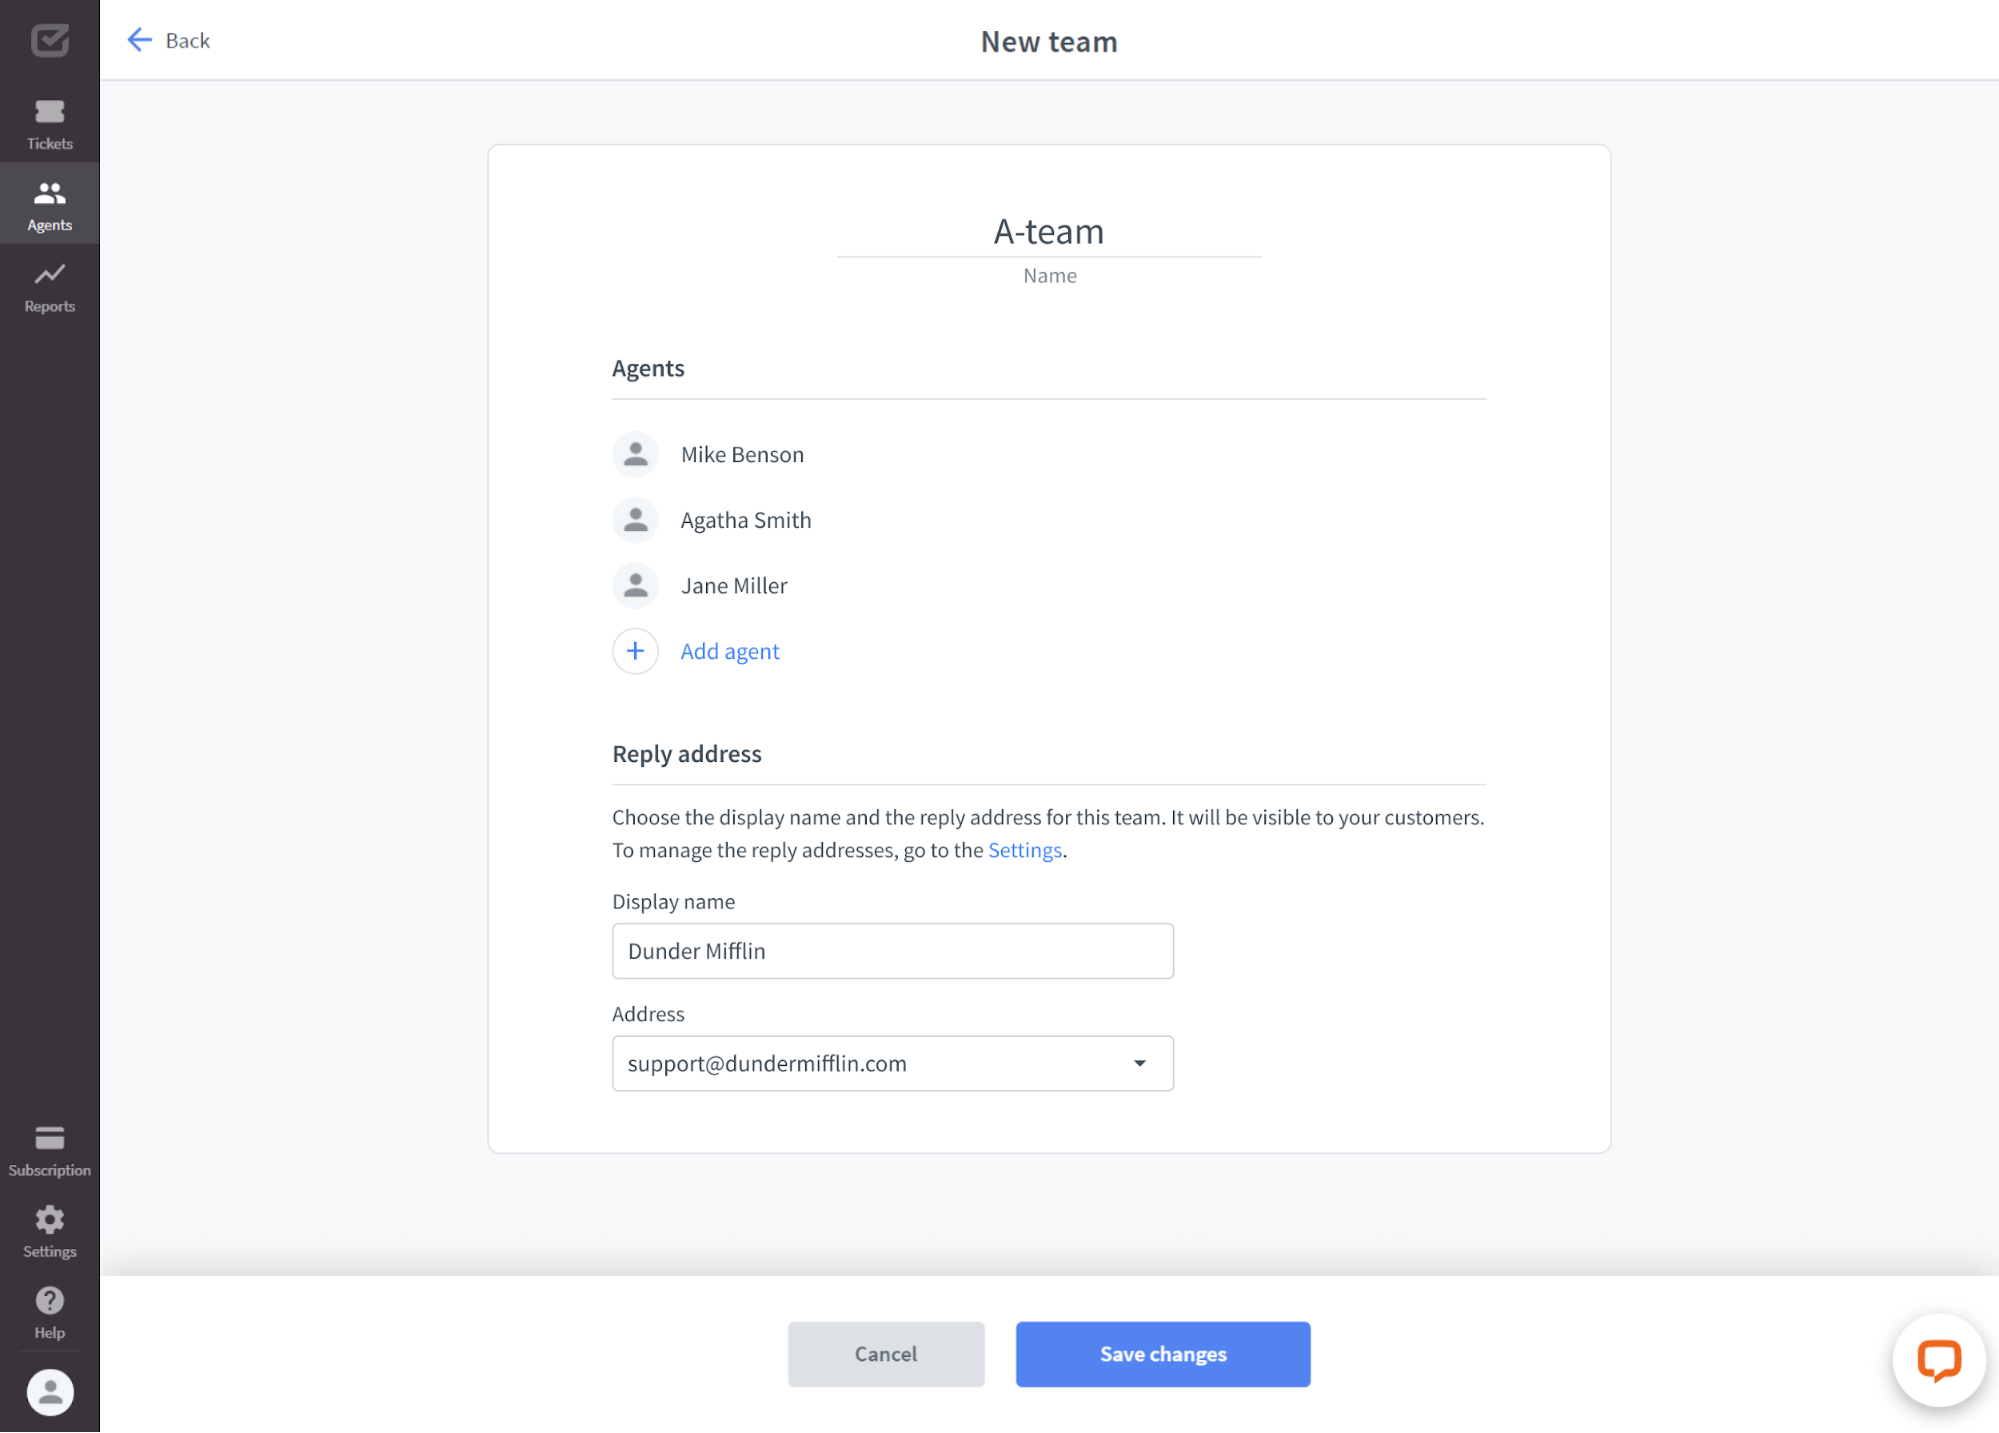
To add a reply address to the team, use the drop-down list and select one of the available addresses. This associates the team with a specific reply address.
Adding the reply address to the ticket
When you manually add a ticket, you always select the team responsible for handling it. Note that the team you select is associated with the reply address from which messages will be sent.

Deleting the reply address
You can delete the particular reply address at any time. However, remember that if the reply address you intend to delete is assigned to one of your teams, their reply address will be changed to a default one.
You’ll be notified to avoid accidentally deleting the reply address.

What address will your recipient see?
See what address will be displayed to the recipient depending on how you’ve configured your domain.