 158 29
Create custom fields to store additional information about tickets, requesters, and organizations in the ticket details.
Think about the purpose of your custom field and the data it’ll contain. You can go with, for example, order number, order details, contact ID, requester’s website, delivery date, credit card number, social security number, requester’s age, shipping address, deal worth, and so on.
Learn about the benefits of custom fields in a nutshell.
Custom fields will be visible in the ticket details, making it easier for you to work on the case and give the best answers.

Creating custom field
To create your first custom field, go to the “Settings” section and choose the “Custom Fields” category. Then, you can see the main dashboard for managing your custom fields.
Click on the “Create custom field” button.

You’ll see a panel to create your custom field.

Display name
First, add a display name for your custom field. The display name will be visible in the custom field list as well as in the ticket details.
Think carefully about the name and make it descriptive and fit the data it’ll contain, for example, order number, order details, contact ID, requester’s website, delivery date, credit card number, social security number, requester’s age, shipping address, deal worth, and so on.
Type
Next, choose the type of custom field. You can choose from the following options:
-
Single-line, max. 28 characters
-
Multi-line, max. 480 characters
-
Link,
https://website.comformat -
Date, date picker with
YYYY-MM-DDformat

You can see a preview of the custom field type on the right.

Teams with access
Another field is teams with access. This setting relates to the access (that is, visibility) of custom field values in the ticket details, depending on the team selected.
Select the teams that can browse custom fields in tickets.

Who can change the custom field value?
In this setting, you need to decide who will be able to change the custom field value in the ticket details. You can choose from three options:
-
Admins only
-
Admins and agents
-
No one (API integration) — your custom field will be populated with data through a dedicated integration created using the API documentation. As a result, admins and agents won’t be able to edit the values manually.

API key name
The API key name is fetched when you enter the display name for the custom field. You can change it during custom field creation according to your needs.
You can use API key name to set custom field values via the API. Browse our API documentation and use a unique API key name to create custom fields in HelpDesk.
When you’re done setting up your custom field, click on the “Create” button. The custom field will appear in the list of custom fields, as well as in the ticket details.

You can have up to five activated custom fields in the list. If you want to enjoy unlimited custom fields, upgrade to the Enterprise solution.

Editing custom fields
You can always edit your custom field and change its settings regarding the display name, teams with access, and who can change the value of the custom field. The custom field type and API key name can’t be edited.
To edit your custom field, go to the list of custom fields, find the right custom field, click the “Edit” button, and start updating your custom field.

Once you’re done editing, click the “Update” button.

Searching tickets using custom fields
“Uses” in custom field settings
If you want to find tickets with a specific custom field, you can go to the custom field settings, look at the “Uses” column, and click on the number of tickets. In this way, you can easily filter out the relevant tickets.

Search bar
Also, you can use the search bar. Let’s now review two simple cases.
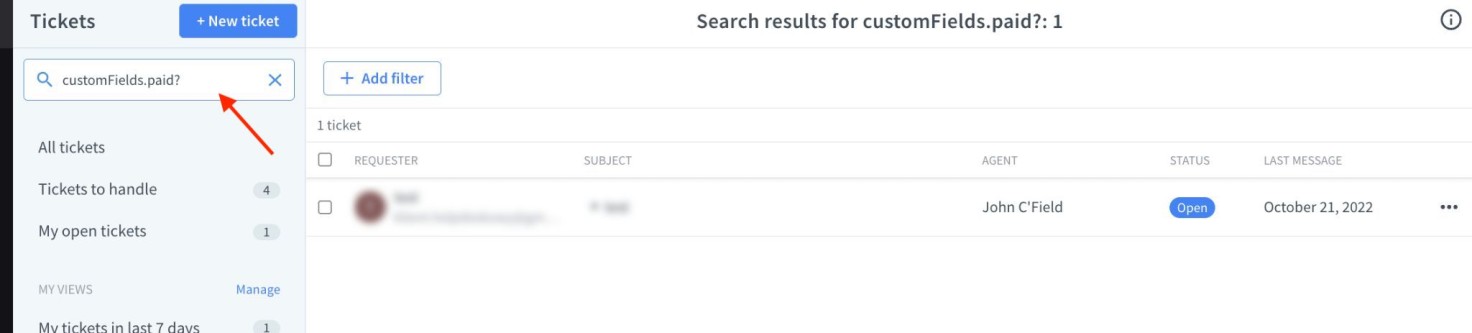
- If you want to search for all tickets that have any value for a given custom field, use this query: customFields.?
For example:
If you want to find custom field with apiKey= paid
Write this in the search bar: customFields.paid?
- If you want to search for all tickets that have a specific value for a given custom field, use this query: customFields.:
For example:
If you want to find tickets with order number 12345
Write this in the search bar: customFields.orderNo:12345

If the custom field value is a link or contains spaces (for example, in a multi-line custom field type), you must enclose the value in quotation marks “”:
customFields.link:“https://www.amazon.de/-/en/Nike-Mens-running-shoes-black/dp/B09NSY3S5N"
customFields.comments:“This client wants a refund”
And for the date type of the custom field:
customFields.orderDate:2022-10-12
Deactivating custom fields
If you no longer want to fill a custom field with data and find it unnecessary at the moment, you can deactivate the custom field on the spot.
To deactivate your custom field, go to the list of custom fields, find the right custom field, and click the “Deactivate” button. The custom field will be deactivated immediately and it won’t be available in the ticket details.
Remember that you can activate it at any time in the future with a complete data set.

Deleting custom fields
If you no longer need a custom field, you can delete it from the list of custom fields.
To delete your custom field, go to the list of custom fields and find the right custom field to delete.
Next, click on the number of tickets in the “Uses” column to manually clear the custom field values from all tickets.

Once you’re done, go back to the custom fields list and click the “Delete” button. The custom field will be deleted forever.

Editing custom field value
After you create a custom field and activate it, you can change its value directly in the ticket details.
Click on the “Edit” option to change the custom field value to your needs.

